
2. Forming Your Own Business Entity
As a 1099 employee, you are viewed by the state as a business providing a service to our business. In this case, psychology services. In order to begin that relationship, you will need your very own business entity.
While creating a business entity sounds like a big endeavor, it is actually very simple and takes less than an hour a year to maintain. This guide will walk you through the steps of creating your business entity, which entity type is most common for psychologists, and what maintaining that entity will entail. If you would prefer to simply pay a business attorney to create and maintain your business entity for you, that is a perfectly sound option as well. If you would like, we can even refer you to a trusted attorney in our network.
Disclaimer: We are not lawyers, nor are we providing you with legal advice. This post is meant to simplify your onboarding process by doing some of the legwork for you. The information in this article is what we've found to be the most commonly recommended approach to psychologist forming a business entity, along with the steps you can use to take the same approach. There are other strategies out there, this is just the one we’ve found to make the most sense.
The Entity: PLLC
You may have heard the term LLC or Limited Liability Corporation in the past. What we’ll show you how to create today is a variation of an LLC called a PLLC or Professional Limited Liability Corporation. A PLLC offers the same protections and tax benefits found in an LLC, but offers some additional protections around malpractice events as well. The PLLC is specifically designed for licensed professionals, like doctors, lawyers, and psychologists. In fact, only certain licensed professionals can legally own a PLLC.
Step by Step Instructions
Start by going to Sunbiz.org. This link will take you directly to their “Create a Florida Limited Liability Company” page. This page can be used to create a PLLC as well as make changes to an existing one.
Next, click on the button that says, '“File or Correct Florida LLC Articles of Incorporation”. You can see it circled in the image below.

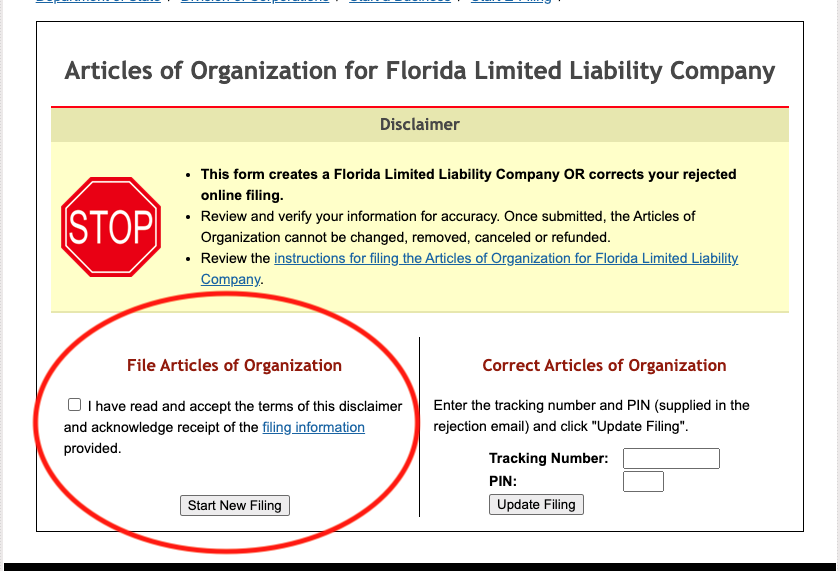
On the next page, below where it says, “File Articles of Organization”, check the box that acknowledges you read the disclaimer and then click the button below it to “Start a New Filing”.
Now you should be on the main page for filing your articles of incorporation. This page has all of the fields you will need to fill out in order to file. The questions are all easy to answer, but some of them are worded in jargon and sound more complex than they actually are. We’ll cover each group of fields below to clear up any confusion.
Filing Information
It starts with the “Filing Information” section. First it asks you what “Effective Date” you would like? This is just the day you want the records to show as the day you started your business. it can be up to 5 days earlier than today. The easiest answer to put here is today’s date. Next, it asks if you want a “Certificate of Status” or a “Certified Copy” of your articles of incorporation. I typically don’t select these, as they send you proof of your filing in the mail anyhow (I also screenshot the Document Number it assigns me after filing). But, you are welcome to if you would like.
The important part of this section is the “Limited Liability Company Name”. You can name your company whatever you would like. Typically, psychologist will just use their name (Dr. My Name, PLLC). The important part is, after the name you select, you put “,PLLC” after it. This is what designates you as a PLLC. For example, Dr. Jamie Appleseed, PLLC.

Principal Place of Business & Mailing Address
The next two sections are “Principal Place of Business” and “Mailing Address”. To keep things simple for myself, I typically put my personal address for both of these. Principal Place of Business assumes you’re renting an office somewhere, while Mailing Address is where you want them to send you any mail about your articles of incorporation. You can put whatever address you think makes the most sense for you. Every year, you will have to confirm your contact information is still up to date, so if you’re worried about moving, know that you have regular opportunities to update the address you listed.

Name & Address of Registered Agent
This section, to me, is one of the jargon sections I mentioned earlier. By that, I’m referring to the use of “Registered Agent”. This very official sounding title is really just the person in your business who will be in charge of filing and maintaining your articles of incorporation. Which, if you’ve gotten this far into the article, I’m going to assume that person is you. So here, I would simple, once again, list your name and address. There’s a field called “Business To Serve As RA”, which is only if another company or attorneys office is filing these articles of incorporation. Since you are filing for yourself, you can leave this field blank. Then be sure to type your name into the yellow section, which is you acknowledging that you are the Registered Agent.

Any Other Provisions & Notice of Annual Report
The “Any Other Provisions” section is where you can write a purpose statement for your business. Though it says this section is optional, since you are creating a PLLC, they do require you to add a business purpose. If you skip it, they will deny your application. Luckily, your business purpose doesn’t need to be anything elaborate. Something as simple as, “Provide psychological services in a private practice setting” will suffice.
The “Notice of Annual Report” section is there to inform you of the yearly requirement of filing an Annual Report. While this sounds complicated and time consuming, it very much is not. The Annual Report is the yearly opportunity I mentioned earlier where you need to confirm that your contact information is still up to date. And that’s really all the report is. Every year, they’ll send you an email reminding you to file your Annual Report. Be sure to do so within the window they provide (January 1st to May 1st) in order to avoid the $400 late fee. The email they send will have a link to their Annual Report page, where you will enter the document number they provide you after you file, and you’ll be able to see all the contact information you listed today. If any of it changed, you can update it. Otherwise, just confirm it’s the same, pay the filing fee, and you’re done.
At the bottom of this section, there’s an area called “Correspondence Name & Email Address”. List your name and the email address you want to receive your yearly reminder through. Then, once again, enter your name in the yellow section signifying that you are the person selected from your company to receive these correspondences.

Name And Address of Person(s) Authorized to Manage LLC
The purpose of this section is to list the managers of the business. It also provides companies with multiple business owners or individuals in charge of managing the business the ability to list those managers so they can be given rights to manage any changes to the articles of incorporation if needed. This section looks like a lot of fields to answer, but it is actually just a small group of fields, repeatedly listed so you can list multiple members of the company. You will just need to fill out the first group.
The first field is the “Title” field. There are a number of options it gives you to put for this field (MGR, AMBR, AP, etc.), but the one you want to list is “MGR”, which means “Manager”. After that, you will once again list your name and address. The field “Entity Name to Serve as MGR, AMBR, AP or Other Designated Titles” can be left blank, as this field is for cases when another business entity will own this PLLC.

Final Steps!
Home stretch! Before you hit continue, review the information you’ve entered to ensure accuracy. If everything looks correct, you can go ahead and hit continue. From here, you’ll be able to see the information you’ve entered and follow the final steps to file your articles of incorporation. Afterwards, you should see a confirmation of your filing, as well as the “Document Number” you’ve been assigned. Be sure to capture that number. I like to take a screenshot of it and create a file on my computer to keep all my important filing and IRS information. That way it’s all in one place and easy to find.
Things To Lookout For
Physical Articles of Incorporation - In several weeks, you will receive a physical copy of your Articles of Incorporation in the mail. Be sure to file these somewhere for safe keeping
Employer Identification Number (EIN)- You will be given instructions to file for an Employer Identification Number (EIN) with the IRS. Sometimes referred to as a Tax ID, this number allows you to file taxes for your new business. Beware of websites that offer to apply for your EIN in exchange for a fee, you can easily file for free through the IRS. For more information on filing your business taxes, checkout our Tax Time Tips & What To Expect article.
Scams - There are companies that scrape the Sunbiz.org database for businesses that recently filed. Then they’ll send you a letter in the mail that looks like an official document from the state of Florida. It will typically say something like, “You have one more step left to file” or that you need help filing for your “Certified Copy” or something along those lines. These are scams to get you to pay them unnecessary fees. Try not to fall for them. You can typically find small print saying “We are not a government agency” or something along those lines. Everything you need to pay for when filing your Articles of Incorporation can be done online at the time of filing. Typically, these letters stop coming after a month or two.
Congratulations on your new business entity! You’re now the proud owner of a PLLC.